Showing posts with label cheapcheapcheap. Show all posts

Monday, March 4, 2013

The Only DIY Green Cleaner Post You'll Ever Need


Green cleaners are expensive. I want my household products to be environmentally friendly, but I also need them to be affordable. So are there such things as ecologically sound, frugal cleaners?

Yes. And the good news is you can replace fabric softener, toilet bowl cleaner, bathroom cleaner, floor cleaner, oven cleaner, countertop cleaner, et cetera with four super cheap products.


These prices are from Amazon, because its easier that way! Two gallons of white vinegar are only $5.91;a one pound box of Arm & Hammer Baking Soda is also around five dollars; Amazon is selling Bon ami scrubbing powder for an INSANE amount of money, but I get it for about seventy cents; and Hydrogen Peroxide, which Amazon is selling for about $2. You'll also need dish soap. Dish soap is the one thing I spend a little extra on, because we don't have a dishwasher, and I need something to make the process bearable. I love Method Dish Soap Pump Refill in Clementine. Each refill bag is about $5. I love how it smells, that it works, that it's a decent choice for the environment, and that it doesn't destroy my hands.

Some people make their own dish soap. I don't. I'm considering it, along with making laundry detergent. I'll keep you updated.

Laundry

Add about half a cup of white vinegar to the final rinse cycle of your wash. It removes ANY icky scents from your laundry, including mildew (J tends to put wet, disgusting dirty laundry in plastic bags (???) where they mildew). Vinegar slays even the grossest mildew stench. It also, somehow, makes towels more absorbent.

All Purpose Cleaner

Dilute vinegar with water, about half and half. Pour into spray bottle. That's all you need for a basic all purpose cleaner.

Now, I saw this pin on Pinterest (from this original source) about soaking citrus rinds in vinegar for a couple of weeks, then draining and using the vinegar as a cleaner.

I like this idea, but it was a little complicated for me. So I tried popping lemon peels straight into my spray bottle. It works! The vinegar is lemon scented, and it preserves the rind. When the vinegar/water solution runs low in my spray bottle I replace the citrus rinds.

Make Your Own Drano

Drano is FILLED with awful chemicals. Before resorting to such drastic measures, try Sandpaper and Glue's Stephanie's DIY Drano. It works on the same principle as your fifth grade volcano project. AND IT WORKS. I have ridiculously thick hair and old plumbing. I clog up drains with a quickness! This clears clogs quickly. Now I use it as a preventive measure about once a month to prevent clogs.

Oven Cleaner

When we moved in, our oven was disgusting. Absolutely gross. I googled around for a bit and landed on multiple ideas. Most of them involved ammonia or other heavy duty chemicals. I found this idea for using baking soda and vinegar from the Frugal Kiwi. However, in one of my old housekeeping manuals (everyone collects something strange, right?) I read about using steam.

So I put a large pan of water in the oven, turned it on 500 degrees, and let it steam up for awhile (don't let all the water steam out). Remove the pan. Use a scrub brush and scrub away. Then wipe down with a rag.

Next shake baking soda on the oven floor. Spray vinegar over the baking soda, and scrub again with your brush. Our ancient oven looks good as new!

Toilet Cleaner

I mentioned that for every day cleaning I pour a little white vinegar in the toilet bowl and scrub with the brush. Doing this a few times a week keeps your toilet nice and shiny clean.

Grout Cleaner

Mix up a paste of hydrogen peroxide and baking soda. It CLEANS the grossest grout. I apply, go do something else, forget I'm cleaning the bathroom, J yells why is there stuff all over the bathroom, I remember I started cleaning the bathroom...

Rinse with REALLY, REALLY hot water. It helps remove any stuck on nonsense.

Vinyl Floor Cleaner

Fill a bucket with hot water, a few good squirts of dish soap, and a couple of tablespoons of either Bon Ami or baking soda. Rinse with regular water.

Tile Floor Cleaner

HOT water, 1/2 a cup of baking soda, 1/4 cup of hydrogen peroxide, 1/4 cup of vinegar. This is a green version of this pin.

Glass Cleaner

This is my favorite glass cleaning recipe. Mix a quarter cup of white vinegar with 1/2 a teaspoon of dish soap and water. It's a little sudsy, but leaves your glass sparkly clean.

Bathtub/Sink Cleaner

Mix up a paste of Bon Ami and dish soap. Apply to tub and scrub. This cleans the GROSSEST tubs. For regular cleaning, I use either my all purpose vinegar cleaner.

Soap Scum

Pour vinegar directly on the scum. Leave for a minute, then wipe away. The vinegar eats through the scum!

Metal Cleaning

This post on Apartment Therapy is full of simple, green, cheap ways to clean and polish all different sorts of metals.

 General Tips


  • Hot water is your friend. Sometimes I actually boil water to use in cleaning. 
  • Bon Ami is non-toxic and safe to use as a scrubber.
  • I have no experience with stone countertops, but here's a post with some ideas for making green cleaners for it.
  • Keep your cleaners where you use them! I keep a bottle of my all purpose cleaner in the kitchen AND in the bathroom. A mason jar holds straight vinegar for toilet cleaning right on the shelf above it. 
Now I want to hear about YOUR cleaning recipes and ideas!


Friday, October 26, 2012

My Lamps Wear Underwear!


Even as we struggled to find a color palette that worked with J's dark leather sofa and our living room's cave-like light, I knew I wanted to use bright blue as our main accent color. It's bright, it's happy, it's color we both like (important!), and it ties in to the fact we live at the lake. So one of the first things on my "We Really, Really Have to Buy" list were lamps for the living room. I wanted a matching pair, and I didn't want to spend more than $12 for the set. Lamps are one of those things where I just can't spend money. Thrift stores, yard sales, and other resale places are full of lamps. Most of them, undoubtably, are hideously ugly. But if you look past horrid colors and terrible patterns, you'll see nice shapes. Zero in on the nice shapes. Lamps are so very easy to fix. So we found this set of lamps for $10. For the pair! Yes ma'am! So while the 1980s flower power pattern isn't my taste, the classic Chinese vase shape is. No complaints there. And they even came with shades.
Ugly pattern, cute lamp...painting supplies at the ready!
After bringing the lamps home I taped over the cord and bulb socket with painter's tape, sanded them down with my trusty sanding block, wiped them off with a damp cloth, and spray painted a few light coats (light coats and staying in motion while painting are the keys to a successful spray painting experience!). That still left the shades. Finding lamps with shades is awesome, and rare. Shades are expensive! These, though...they look older than the lamps, and they were brittle to the touch, yellowed, and made me think I smelled smoke every time I looked at them. They needed help.
Painted, but the stinky shade remains

We lived with them for awhile. My first thought was to buy some remnant fabric and recover. Then, as I folded J's undershirts, an idea was born. I raced to the living room and pulled a shirt over the lamp shade. J looked at me like I'd lost my mind. Well, the shirt was way to big! So then I looked through his drawer for a smaller shirt. The medium was practically a perfect fit.

 The first step was to cut the collar and sleeves from the shirts. Then I cut and ripped the old, nasty fabric from the lamp shade. After a quick wipe down, I set to work on recovering the frame. (I really, really wish I'd spray painted the frame at this point.)

Naked Shade!
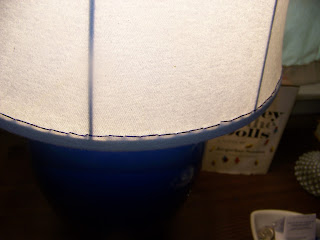
I pulled the shirt over the frame, pinned into place with straight pins, and then trimmed excess fabric from around the pins (this step made it much easier to sew the fabric). Pull the fabric tight, and keep good tension as you pin around the top and bottom of the shade frame. You don't want the fabric to gap. After raiding my embroidery stash, I found some pretty blue thread that matched the color of the spray paint I used on the lamp bases. Leaving the pins in place, I used a simple back-stitch to sew the shirt to the lampshade frame.

This is a simple, back-stitch diagram:

 E FC DB A

The needle comes up from the bottom of the cloth at A, C, and E. Check out Jenny's superior tutorial for much, much better diagrams.

 After sewing the top and bottom hems, pull out the straight pins. Here's a close up of my stitched shade:


Do any additional trimming needed. And...you are done! These are the cheapest lampshades ever! And so easy! I spent maybe 90 minutes doing both, and I was watching Bravo at the time. So...I was probably distracted by the nonsense displayed by a random Housewife of Some Place. I did these about six months ago, and the shades still look great! Here's lamp one, with the light on (the ugly curtains behind are soon to be history, thanks to the Fall Pinterest Challenge, which I will unveil on Tuesday!):


No sagging, no bagging, nothing. The total cost of a pair of matching lamps, with new-ish shades? $13. $10 for the lamps, $3 for some cheap spray paint. I used J's shirts and already owned thread for the shades. Here's lamp two.


See this post at Snap and Someday Crafts.

LinkWithin

Related Posts Plugin for WordPress, Blogger...

Follow Me!

 photo 6_zps494de5b6.jpg  photo 2_zps2ba59d0e.jpg